Saturday, November 10, 2012

Sketch Talk

Here is a summary of a mini talk presented at Chennai Weekend Artists gathering at Chemmozhi Poonga.

Thanks Balaji for the image.
This introductory discussion explored the use of Gesture and Thumbnail as essential tools for Sketching. The ideas are largely based on the great art instructors Kimon Nicholaides and Glenn Vilppu, among others.

Gesture

When we begin drawing, we begin to look at the subject in 'total'. and try to capture the very essential, by ignoring elements such as form, proportions, anatomical details, etc.
Using a scribbling approach , beginning at whichever part of the subject one wants to, the overall appearance, or 'feel' of the subject is captured.
The 'method' is to look at the subject and 'feel' like the subject. feel the tension, twist and turn of the subject, in yourself, and let the pen scribble its way.
Remember, what we are trying to capture is the 'total'. and the 'feel'.

Some examples..

What this does is, it helps us see only the bare essential.  One should keep practicing this from observation. This not only loosens up the hand, but aids us see just enough so that we can re create it at will later.
This approach is an essential part of  drawing by analysis and synthesis. (as opposed to 'copying' the model)

Some examples from imagination...

Eventually we will include subsequent steps that will take us from point A to point B in a systematic and natural manner.


Thumbnail
When we begin to sketch on location, here is a general approach.
(1) Identify your frame
  • First step is to Identify a subject, or view of interest. 
  • Fine tune the view by visualizing the frame. If needed using a view finder. (Make a simple view finder) 

Now draw a few thumbnails each should not take you more than 10-25 seconds.
(2) Thumbnail
  • Draw 3-4 gestural lines exploring the frame.
  • Identify major forms, 3-4 maximum.
  • Identify the tones, using 2 tones and the white of the paper.

Here is an example (Let me add that step (1) is already taken care of well in these examples through the eyes and lens of Murali)

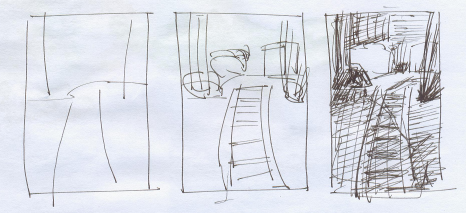


Another example..


These simple preliminary steps aid in a better picture subsequently. Next steps include how we organize the space into foreground, middle ground and background, and how we use techniques such as linear and atmospheric perspective as well as textures to define the three planes, etc.

Equipped with this simple yet effective tools, we can create more effective sketches, in an enjoyable manner.

Friday, September 14, 2012

Thumbnail Sketching

As I have recently discovered, Sketching on Location, is an exciting activity. It takes creativity and connecting with the subject to a new level. Most important aspect of sketching on location, is finding the right 'frame'.

While sketching from references, these reference images already come with frames, with a bounded rectangle. One can still do some cropping. But a lot of it is already fixed. On location, one must find the nice view, with the good balance. Typically, something interesting strikes you, and you start looking at the subject, and spontaneously begin sketching. This spontaneity is the fun of sketching.

At times, you might look for not only the subject, but the proper context too. Thumbnails are a great way to explore a scene.

As Glenn Vilppu the master, elaborates, in his classic manual, Sketching on Location, these are tools of importance. The idea is to abstract the scene, and create highly simplified views in very small size.

Here are some tools that you can make that can come handy.

A viewfinder

  1. Take the heavy backside of a used sketchbook
  2. Draw a rectangle about 2.5" by 3.5" (choose what works for you)
  3. Leave 1/2 inch on three sides, and an inch on the left side(to make it easy to hold)
  4. Cut these lines with a craft knife.
  5. Don't throw away the piece in the middle yet! You can use it to vary the ratio of the view!


A Mini Sketch book
Unless we are making a series of sketches with some sequence, it helps to focus on one picture at a time.

  1. Take a bunch of copy papers
  2. Cut each into 8 small pieces
  3. Take the heavy backside of a used sketchbook
  4. A slightly thick sheet for a cover
  5. cut these to the size of the small pieces of paper.
  6. Punch  4 to 5 holes on one side
  7. Take some spiral wire, cut it to size, and bind this into a book!


Tuesday, September 4, 2012

Sanguine

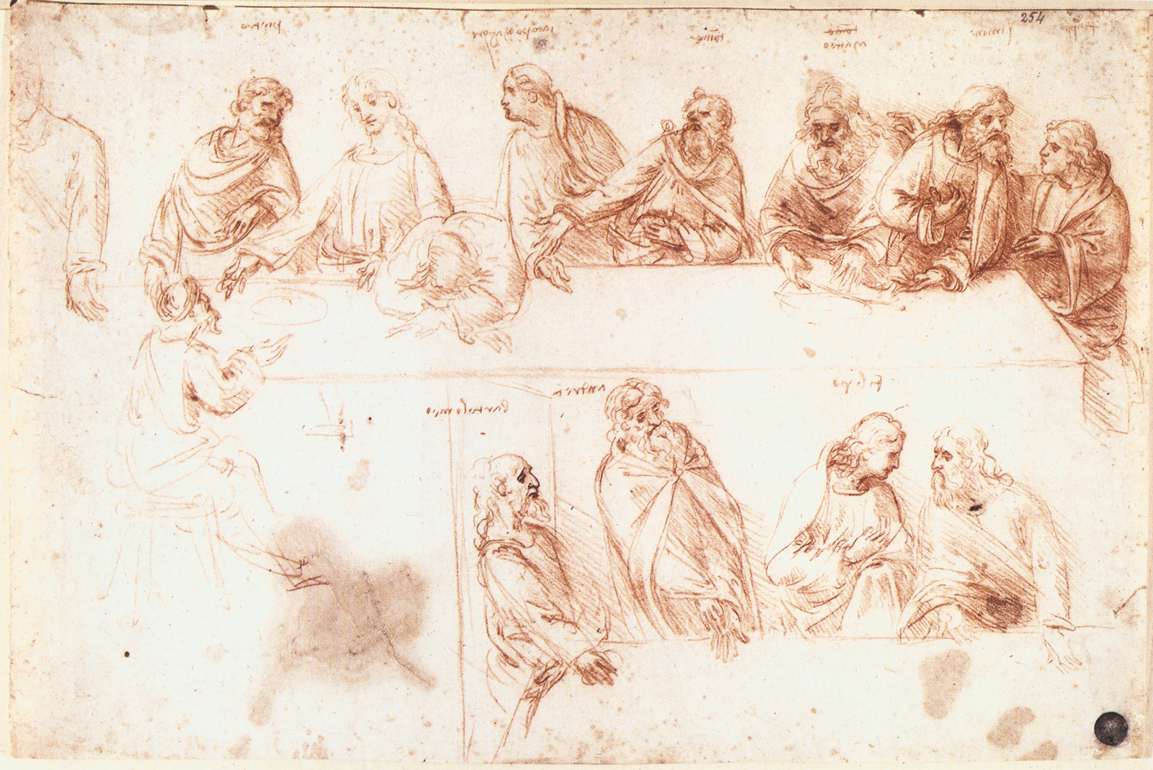
I was always intrigued by the strange combination of red color particularly reddish browns, with a dash of black and white, found in the drawings of the Masters. These were drawings, either exploratory sketches or detailed studies, for a more grand painting that would follow. But these in themselves are works of art.

Leonardo's study for The Last Supper - Sanguine

The material used was Sanguine. Its a red chalk naturally available in Italy, and the name means its the color of blood. Sometimes just the red chalk was used and sometimes along with black, to create accents, and a bit of a tonal range. 

Leonardo's Roaring Horse - Sanguine and Black

and sometimes with black and white (known as Trois Crayon technique - Three crayons!), for a still wider range to define form. 

Watteau Jeune - Sanguine, Black and White
While in a pursuit for a drawing pencil that would neither smudge like charcoal, nor be shiny like graphite, yet produce pitch black, and with a smooth traction on a nicely toothed paper, I recently discovered some amazing materials, thanks to my friends at The Sketching Forum.

All of them were available from the amazing Austrian company Cretacolor. (There is similar set of products from possibly its parent(?) Koh-I-Noor)

A beautiful black oil based carbon pencil, the Nero that comes in several hardness. I got the Soft and Extrasoft and am amazed.

A dark and light Sepia set, again oil based, which produces a rich deep brown in two tones.

And then, this amazing Sanguine! this is the pencil that I have fallen in love with. amazing consistency, and color.


One must note that these also come in dry chalk version, its a personal choice, and I prefer the oil.

To top this all, these pencils, also come as leads with a whopping 5.6 mm diameter (yes, you heard it right, its not .56 mm) !


..and.. there comes a solid metallic holder which is the magic wand. There is one particular version , the Classic, which is triangular, and has a solid grip, the whole holder is so comfortable and gives such a great feel, it changes the whole approach to drawing. The weight of the holder allows for some amazing use. 


So .... here is my drawing rig.. (1) Sanguine oil lead in the Classic holder, this is used for building forms primarily with a tonal application and (2) the Nero pencils for accentuating... and a paper with teeth! (occasionally I use the Sepias and the white). 

This setup has literally put me back on the "drawing" board. Of all the mediums and materials, this basic setup has brought drawing back into focus, and I am loving it!.